The MikroTik hAP AC Lite router has some important caveats to take into consideration:
- Configuration is much more complex compared to other router brands.
- If you do not have much networking experience it is recommended to use another router.
- You will need to download a third party application to configure: WinBox
Step-by-step guide to set up MikroTik hAP AC Lite router
- Physical connection:
- Connect the PoE in port of the MikroTik hAP AC Lite to the first port (LAN1 or GE1) on your Optical Network Terminal (ONT) using an ethernet cable.
- Sometimes we connect to second port instead of first - check your Welcome email instructions to make sure which port you should use.
- Ensure the router is powered on and that your computer or smartphone is connected to the router via Wi-Fi (if available) or a LAN cable.
- MikroTik routers require a third party app called WinBox in order to configure.
- Download WinBox: https://mikrotik.com/download
- Download the correct file depending on OS.
- Once installed:
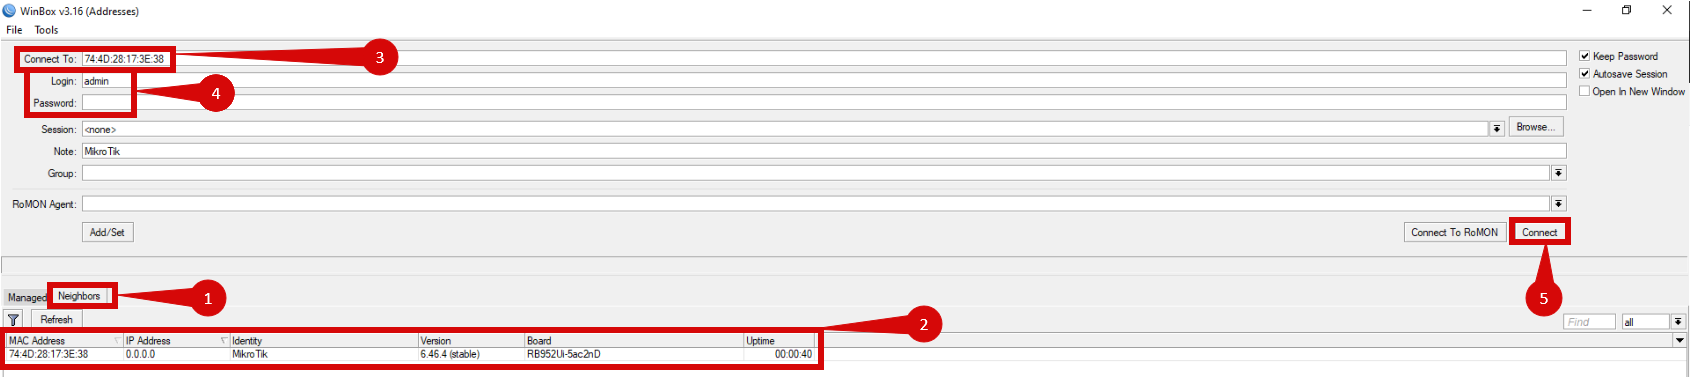
- Open WinBox.
- Go to your neighbor tab (step 1).
- Click on your routers MAC Address to connect (step 2).
- Your MAC Address will then show in the Connect to field (step 3).
- Use following credentials to sign in to device: (step 4).
- Username: admin
- Password: (default configuration has no password).
- Click the Connect button (step 5).
You will need to reset all configuration parameters in order to ensure that configuration for Simply Broadband connection is setup correctly!
- Navigate to System > Reset Configuration (step 1 & 2).
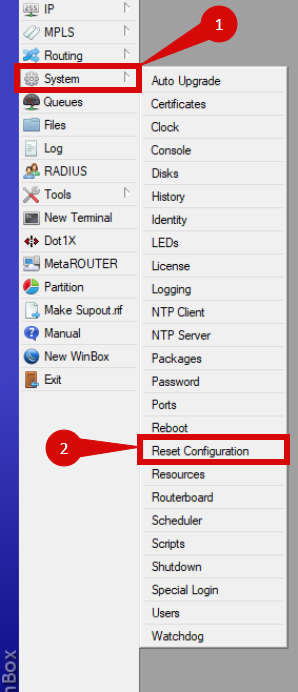
- Tick No Default Configuration (step 1).
- Click Reset Configuration (step 2).
- The router will reboot and you will be disconnected.
- Let router reboot fully then open WinBox and reconnect to the router as done in Part 3 of this guide.
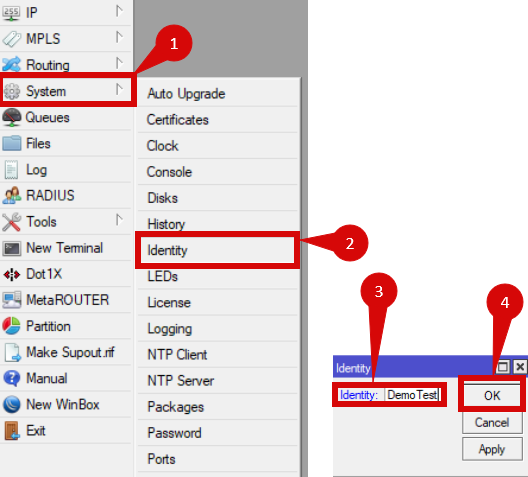
Give your router a name:
- Navigate to System > Identity (step 1 & 2).
- Overwrite the default name with whatever you want it to be called (step 3).
- Press OK (step 4).
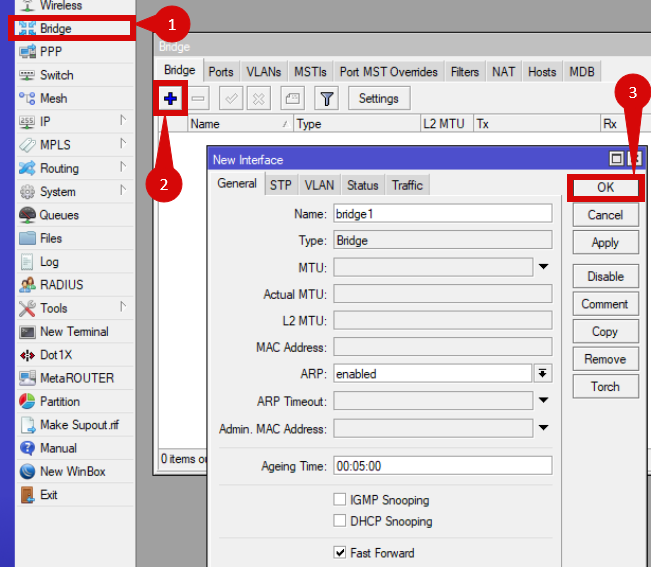
Create a Bridge:
- Navigate to Bridge (step 1).
- Click the "+" button to create a new bridge (step 2).
- Click OK (step 3).
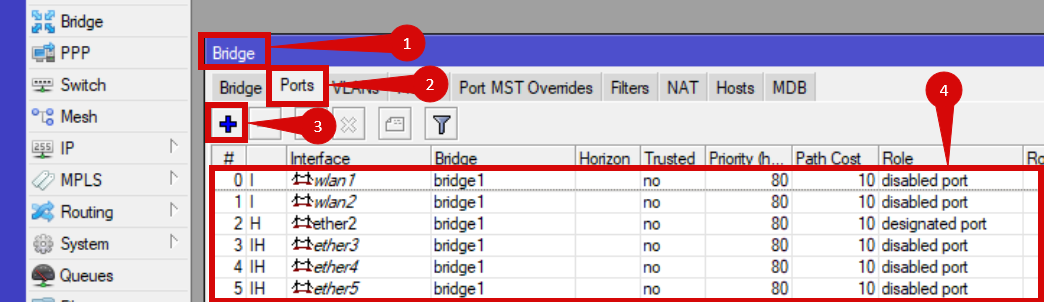
- In the Bridge window click on Ports (step 1 & 2).
- Click the "+" button to add ports (step 3).
- Add the following ports: (step 4).
- ether2
- ether3
- ether4
- ether5
- wlan1
- wlan2
- Add the following ports: (step 4).
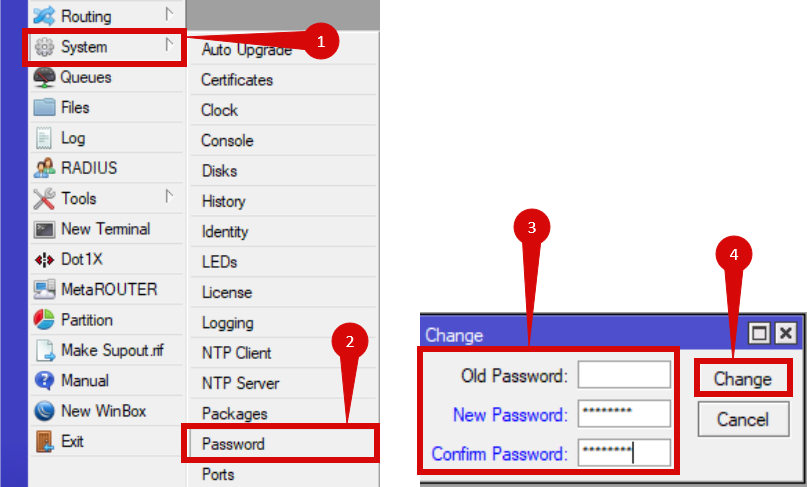
Create login password:
- Navigate to System > Password (step 1 & 2).
- Leave old password blank as default doesn't have a password (step 3)
- Enter pass word under New Password, re-enter under Confirm Password (step 3).
- Click Change (step 4).
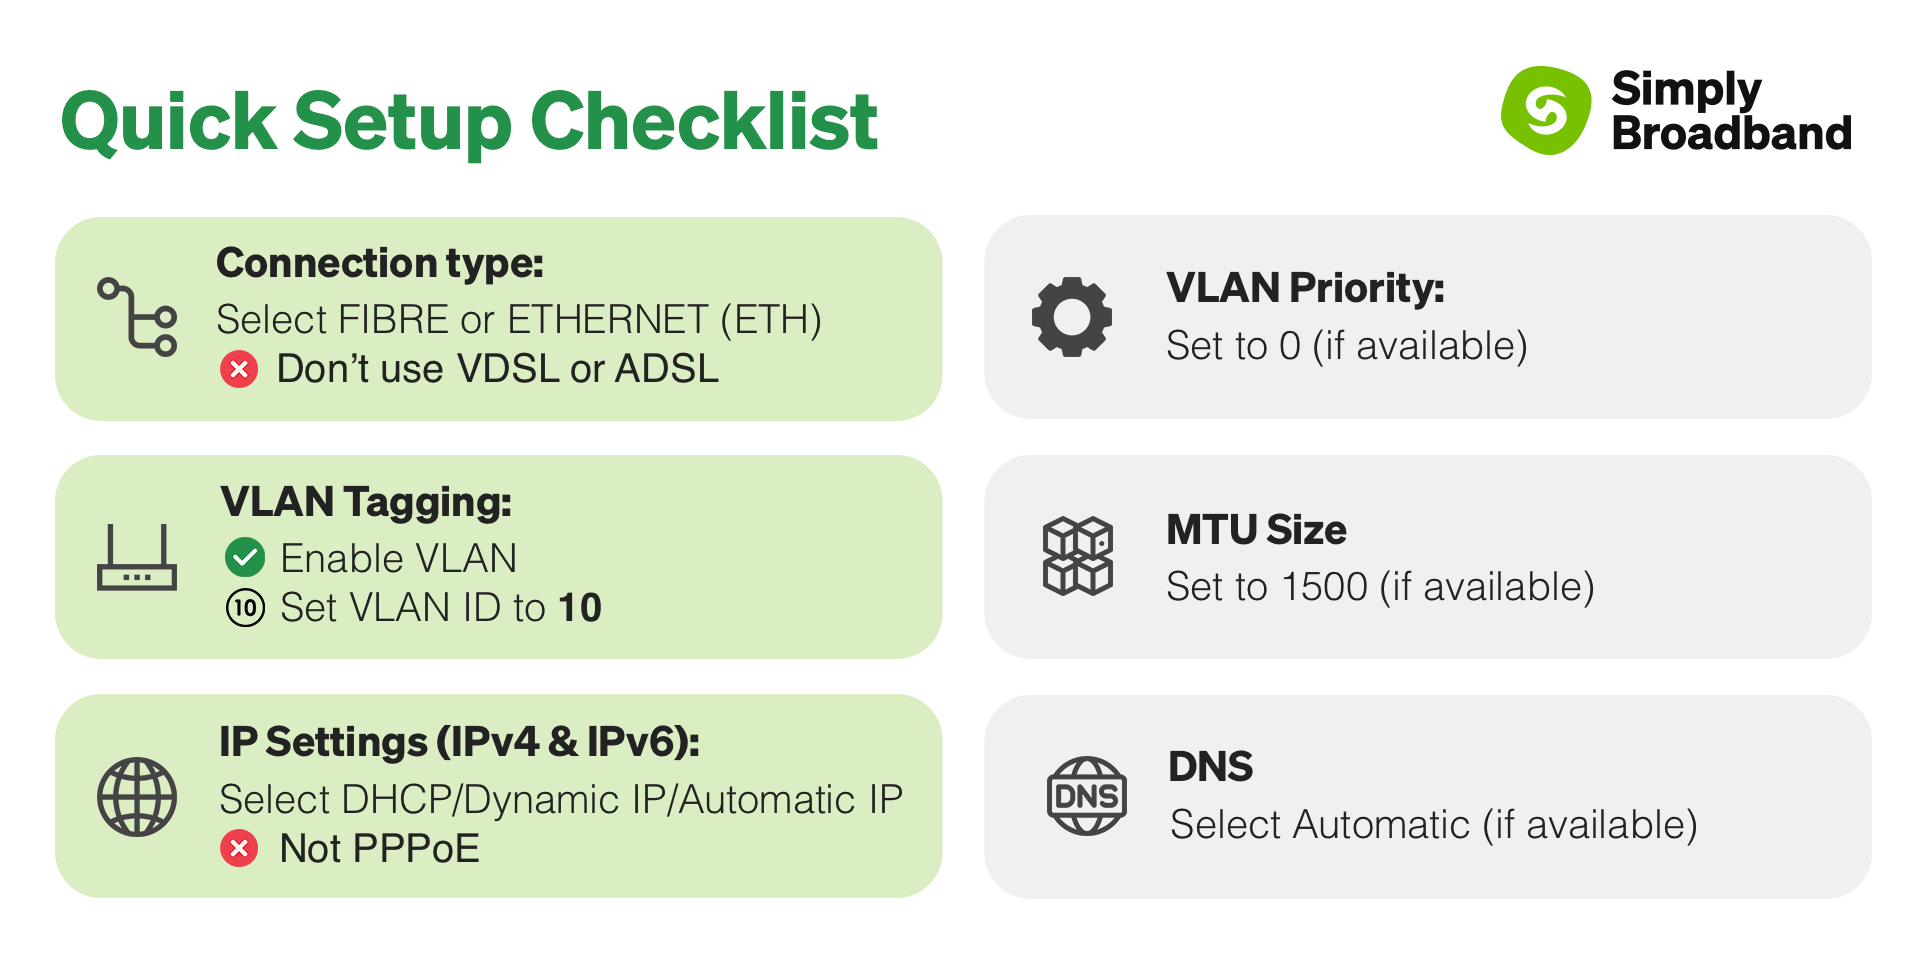
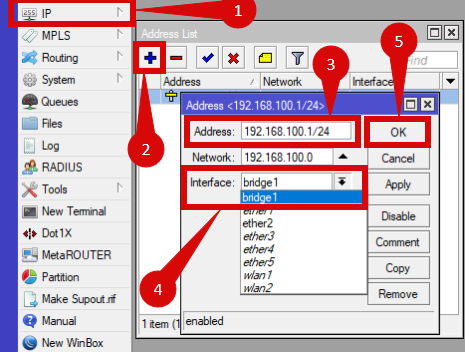
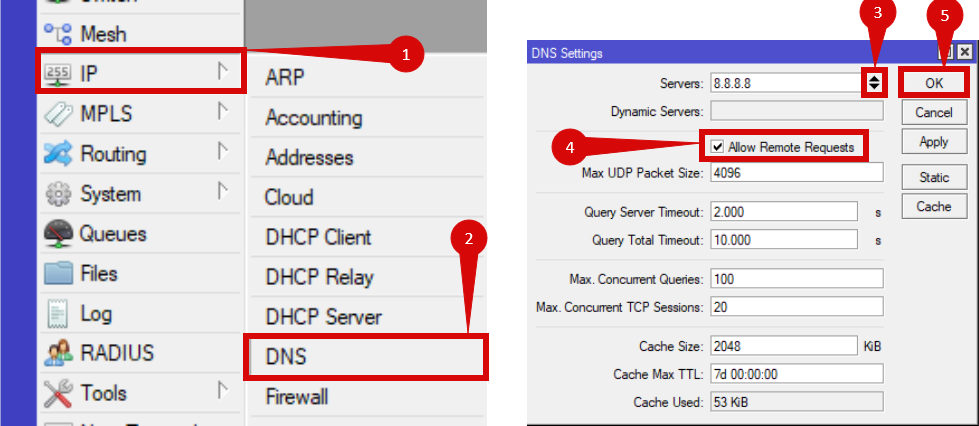
IP Address and DNS Settings:
- Navigate to IP > Addresses (step 1).
- Click the "+" button (step 2).
- Enter the following under Address: (step 3).
- 192.168.100.1/24
- Under Interface set to bridge1 (step 4).
- Click OK (step 5).
- Navigate to IP > DNS (step 1 & 2).
- Click the Down Arrow, right of Servers (step 3)
- Type 8.8.8.8
- Tick Allow Remote Requests (step 4).
- Click the Down Arrow, right of Servers (step 3)
- Click OK (step 5).
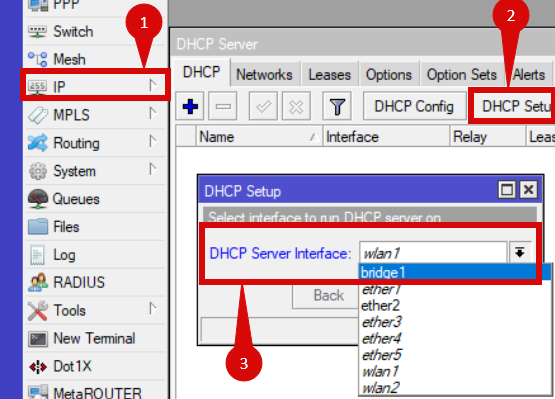
Add DHCP Server:
- Navigate to IP > DHCP Server (step 1).
- Click on DHCP Setup button (step 2).
- Select bridge1 for DHCP Server Interface (step 3).
- Click Next.
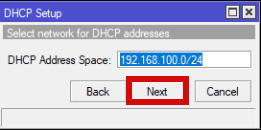
- Click on DHCP Setup button (step 2).
- For DHCP Address Space leave as default.
- Click Next.
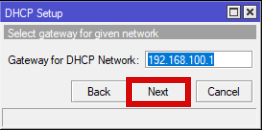
- For Gateway for DHCP Network leave as default.
- Click Next.
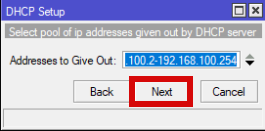
- For Addresses to Give Out leave as default.
- Click Next.
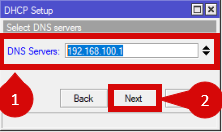
- For Select DNS Servers set to 192.168.100.1 (step 1).
- Click Next (step 2).
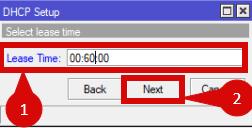
- Set lease time to 60 minutes (step 1).
- Click Next (step 2).
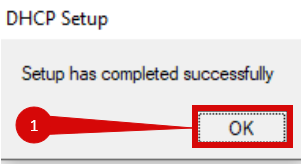
- Once DHCP Server configuration is completed you will see below message:
- Click OK (step 1).
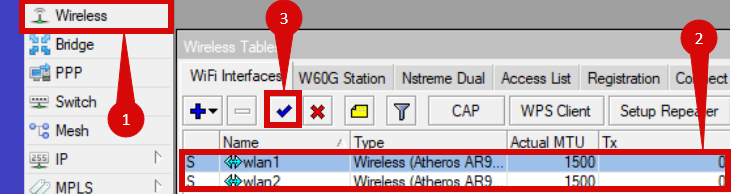
- Navigate to Wireless (step 1).
- Highlight wlan1 & wlan2 (step 2).
- Click the tick to enable the interfaces, if not already enabled (step 3).
- Highlight wlan1 & wlan2 (step 2).
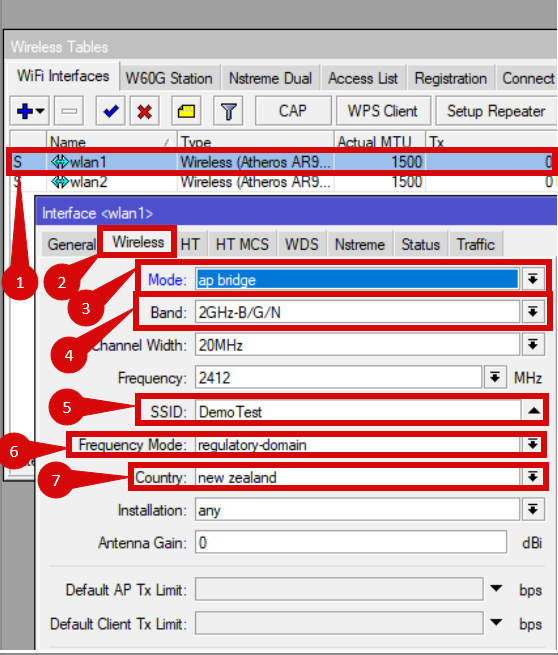
- Double-click wlan1 (step 1).
- Navigate to Wireless: (step 2).
- Change Mode to ap bridge (step 3).
- Set Band to 2GHz-B/G/N (step 4).
- Enter your SSID (what we named your device) (step 5).
- Set Frequency Mode to regulatory-domain (step 6).
- Set Country to New Zealand (step 7).
- Click OK
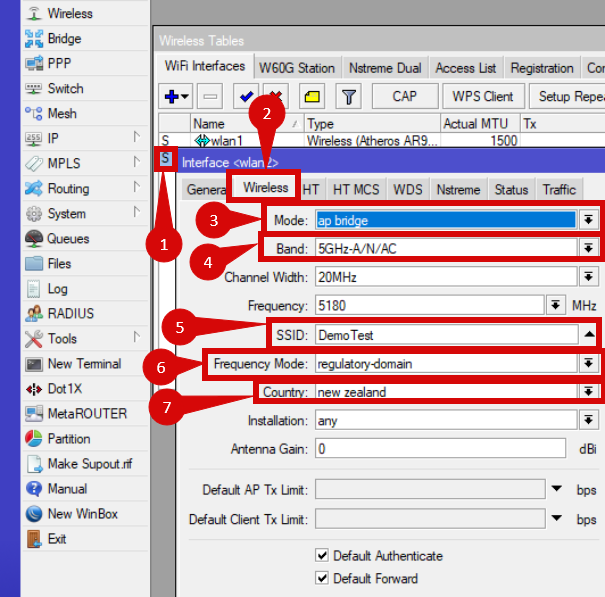
- Double-click wlan2 (step 1).
- Navigate to Wireless: (step 2).
- Change Mode to ap bridge (step 3).
- Set Band to 5GHz-A/N/AC (step 4).
- Enter your SSID (what we named your device) (step 5).
- Set Frequency Mode to regulatory-domain (step 6).
- Set Country to New Zealand (step 7).
- Click OK
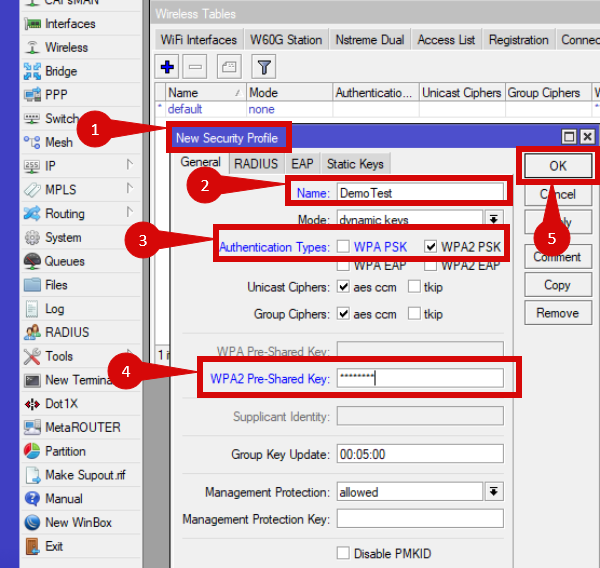
Next we will setup a wireless security profile:
- In the Wireless Tables window navigate to Security Profiles
- Click the "+" button to add a new security profile (step 1).
- Under Name enter your SSID (step 2).
- Set Authentication Types to WPA2-PSK make sure it is Ticked (step 3).
- Enter you password under WPA2 Pre-Shared Key (step 4).
- Click the "+" button to add a new security profile (step 1).
- Click OK (step 5).
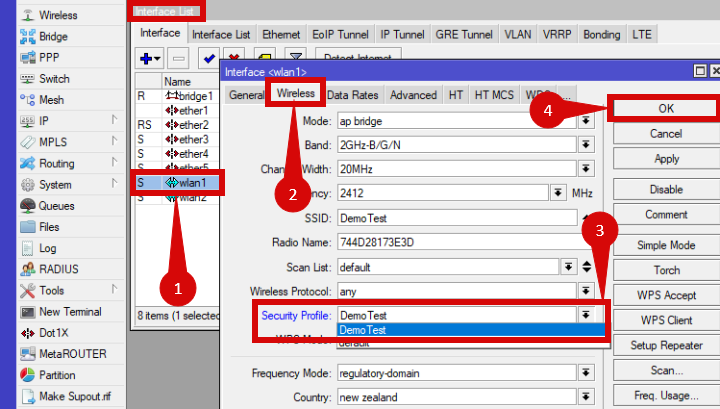
Apply this security profile to both wlan1 & wlan2:
- Navigate to Interfaces
- Double click wlan1 (step 1).
- Click the Advanced Mode button
- Change Security Profile from default to whatever you named the new security profile (step 3).
- Click OK (step 4).
- Repeat but for wlan2
- Navigate to IP > DHCP Client
- Click the "+" symbol
- Change interface to ether1
- Ensure that Use Peer DNS is ticked
- Click the "+" symbol
- Click OK
Configure firewall settings:
- Navigate to IP > Firewall
- Click the arrow (step 1).
- Hover over Show Columns (step 2).
- Make sure Connection State is ticked (step 3).

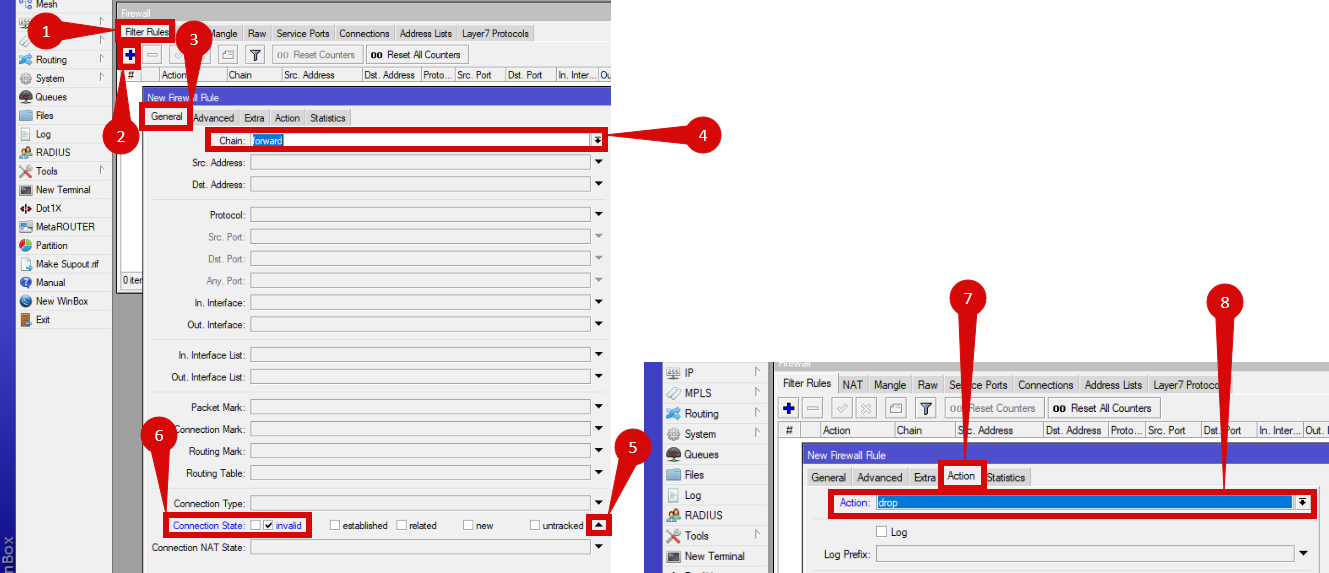
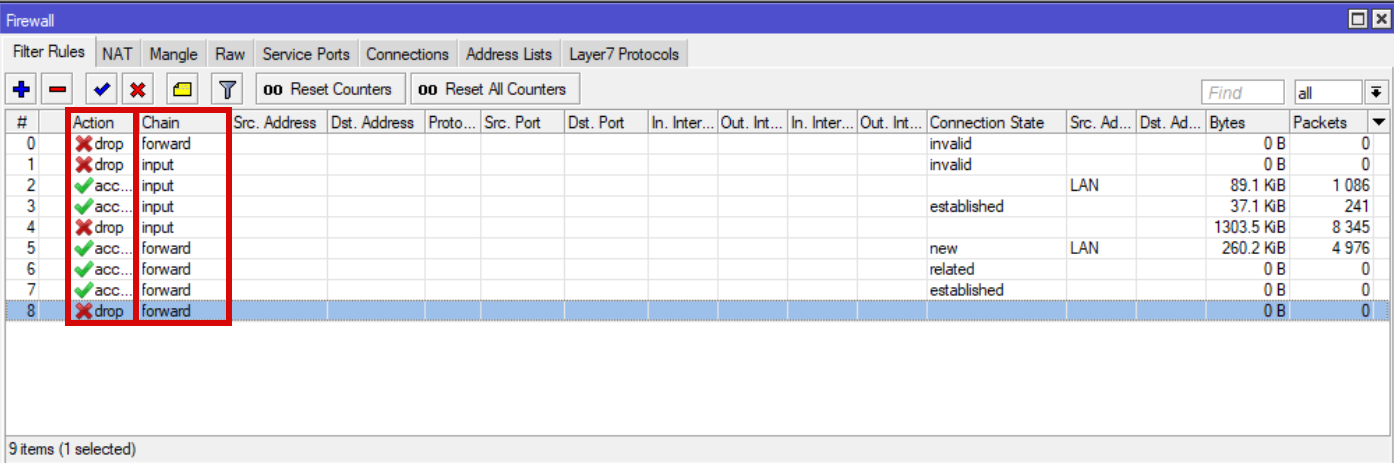
Rule 0:
- Click on Firewall Rules (step 1).
- Click the "+" button (step 2).
- On the General tab (step 3).
- Ensure that forward is set in the Chain field (step 4).
- Click on the arrow next to Connection State
- Tick Invalid
- Navigate to the Action drop-down menu
- Set Action to drop
- Navigate to the Action drop-down menu
- Tick Invalid
- On the General tab (step 3).
- Click the "+" button (step 2).
- Click OK
- Rule 1: repeat this process but for the Input Chain.
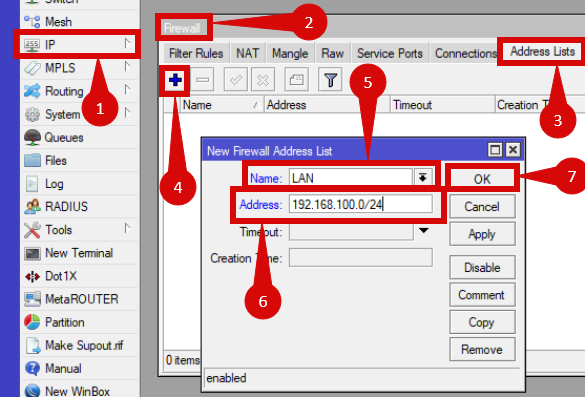
Address List:
- Navigate to IP > Firewall (step 1 & 2).
- Click on the Address Lists tab (step 3).
- Click on the "+" button (step 4).
- Set Name to LAN (step 5).
- Set Address to 192.168.100.0/24 (step 6).
- Click on the "+" button (step 4).
- Click on the Address Lists tab (step 3).
- Click OK (step 7).
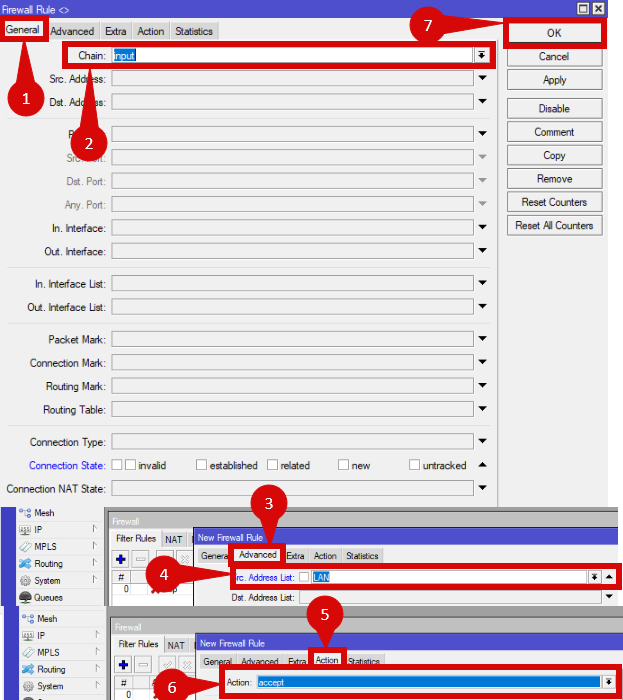
Rule 2:
- Navigate to the Filter Rules in Firewall
- Click the "+" button
- In the General tab: (step 1)
- Ensure that input is in Chain (step 2).
- Click on the Advanced tab (step 3).
- Select the Address List you have made previously (step 4).
- Click on the Action tab (step 5).
- Set Action to accept (step 6).
- Click OK (step 7).
- Repeat above steps for Rules 3 - 8 with some slight alterations:
- Rule 3 – Accept established connections on the input chain
- Rule 4 – Drop new connections on the input chain
- Rule 5 – Accept new connections on the forward chain using the LAN address list
- Rule 6 – Accept related connections on the forward chain
- Rule 7 – Accept established connections on the forward chain
- Rule 8 – drop new connections on the forward chain from ether1
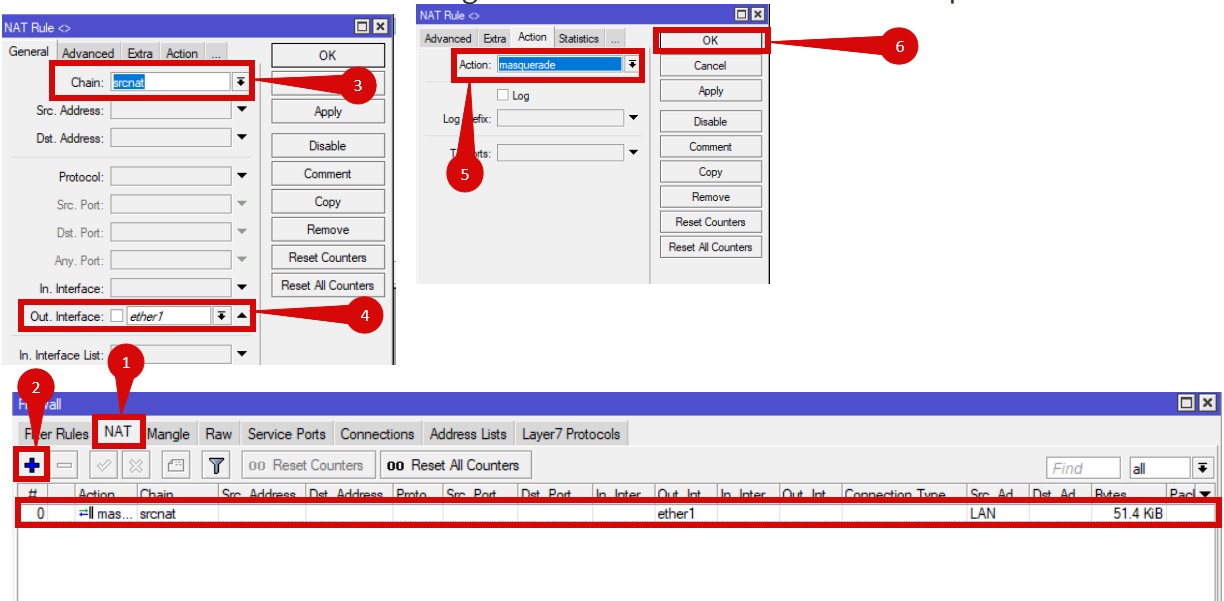
- Navigate to IP > Firewall
- Select the NAT tab (step 1).
- Click the "+" button (step 2).
- Set Chain to srcnat (step 3).
- Set Out Interface to ether1 (step 4).
- Navigate to the Action tab
- Set Action to masquerade (step 5).
- Click the "+" button (step 2).
- Click OK (step 6).
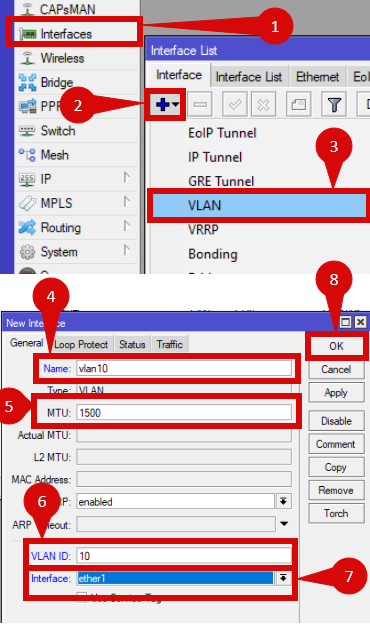
Configuring for New Zealand UFB:
- Navigate to Interfaces (step 1).
- Click the "+" button (step 2).
- Select VLAN (step 3).
- Set Name to vlan10 (step 4).
- Make sure MTU = 1500 (step 5).
- Set VLAN ID = 10 (step 6).
- Set Interface to ether1 (step 7).
- Set VLAN ID = 10 (step 6).
- Click OK (step 8).
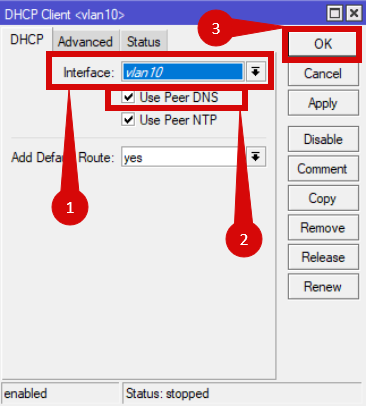
- Navigate to IP > DHCP Client
- Click the "+" button
- Set Interface to vlan10 (step 1).
- Make sure Use Peer DNS is ticked (step 2).
- Click the "+" button
- Click OK (step 3).
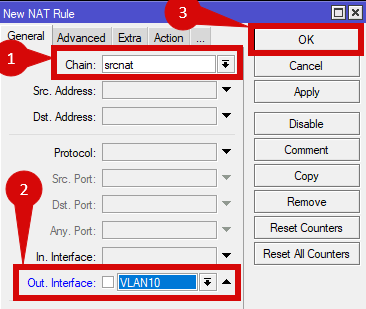
- Navigate to IP > Firewall
- Click on NAT tab
- Click the "+" button
- Set Chain to srcnat (step 1).
- Set Out Interface to VLAN10 (step 2).
- Click the "+" button
- Click on NAT tab
- Click OK (step 3).
- Change the Masquerade rule from ether1 to the VLAN10 Interface you created earlier.
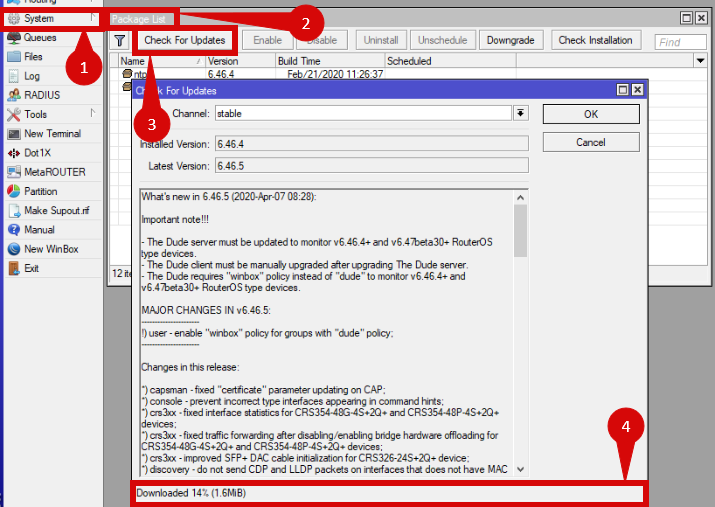
- Navigate to System > Package List (step 1 & 2).
- Click Check For Upgrades (step 3).
- Click the Download&Install button:
- You will see the progress at the bottom of the window (step 4).
- Once updated the router will reboot.
- Reconnect to router:
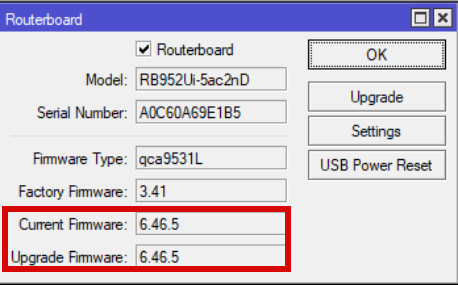
- Navigate to System > Router Board
- Click the Upgrade button
- Click YES to upgrade firmware
- Click the Upgrade button
- Navigate to System > Router Board
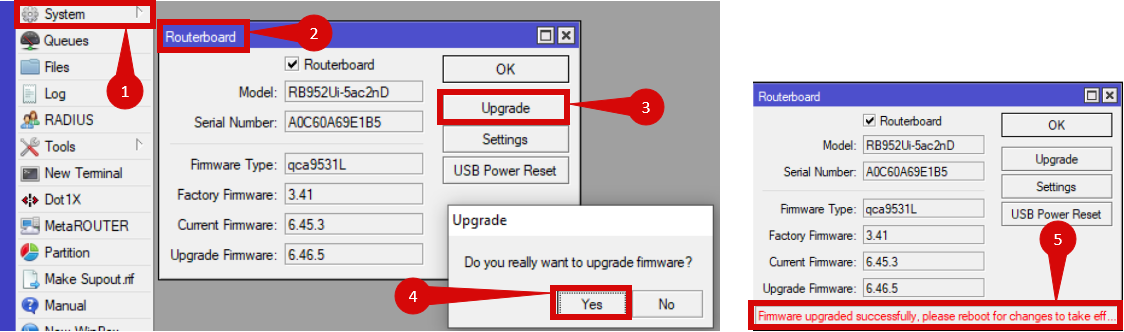
You will need to reboot the router to install new firmware.
Check RouterOS upgrade was successful:
- Navigate to System > Reboot
- Click YES
- Wait for reboot to finish, connect via WinBox again.
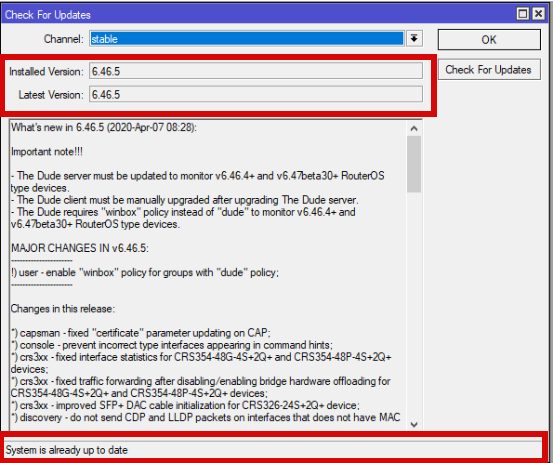
- Navigate to System > Package List
- Click Check For Upgrades:
- You should see the same version number in the Installed Version and Latest Version fields as well as System is already up to date
- Navigate to System > Package List
Check Firmware updated:
- Navigate to System > Routerboard
- You should see the same version number in the Current Firmware and Upgrade Firmware fields.
- Make sure that all steps have been followed.
- Check that all interfaces, profiles, and rules have been set correctly.
- Check that everything else is applied correctly.
- Once the router has restarted, check the status of your Internet connection by looking at the WAN/Internet LED indicator on the router. It should be solid green.
- On your connected device, try accessing a website to confirm that your connection is active.
If your internet connection is not working:
- Restart both the ONT and the router by unplugging them for 30 seconds and plugging them back in.
- Check over configuration.
- Ensure that the ethernet cable is securely connected to the correct ports (first port on the ONT and the WAN port on the router).
If you cannot access the router due to forgotten login credentials or misconfiguration, reset the router to factory settings:
- Find the reset button on side of the router (next to the USB port).
- Unplug router from power.
- Hold down reset button.
- Plug power back in, hold reset until LEDs flash.
- Let go of button.
- If you are still unable to connect, please reach out to our support team at our Support Portal -https://help.simplybroadband.co.nz for further assistance.